 insideevs.com
 Opening: Grow Food and Fish in Harmony: Build Your Own Mini Aquaponic Garden Ready to combine the beauty of a miniature ecosystem with the satisfaction of growing your own food? This guide walks you through building a simple, yet effective, mini aquaponic garden. This system leverages the symbiotic relationship between plants and fish, using fish waste as fertilizer and plants to purify the water. No green thumb required! Let's get started.
Step 1: Gather Your Supplies You'll need a few essential items to create your aquaponic haven. Here's a list to ensure you have everything on hand:
- The Fish Tank: A clear plastic container, 5-10 gallons is ideal.
- The Grow Bed: A container that fits securely on top of the fish tank (slightly smaller than the fish tank's opening).
- Grow Media: Clay pebbles, lava rock, or similar inert material for the plants to root in.
- Submersible Water Pump: A small pump with adjustable flow control.
- Flexible Tubing: Tubing to connect the pump to the grow bed.
- Air Pump & Air Stone: To oxygenate the water for the fish.
- Fish: A few small goldfish or other suitable fish (research appropriate species for your size tank).
- Plants: Leafy greens like lettuce, spinach, or herbs like basil and mint are good choices.
- Water Conditioner: To dechlorinate tap water for the fish.
- Optional: Timer for the water pump, siphon for draining the grow bed.
Step 2: Prepare the Fish Tank This is the foundation of your aquaponic system. Proper preparation ensures a healthy environment for your fish. Clean the fish tank thoroughly with warm water (no soap!). Place the air stone at the bottom of the tank and connect it to the air pump, positioning the pump outside the tank. Fill the tank with dechlorinated water. Use a water conditioner to remove chlorine and chloramine if you are using tap water. Let the tank cycle for a few days before adding fish. This allows beneficial bacteria to establish. Add a small amount of fish food daily to feed the bacteria.
Step 3: Construct the Grow Bed The grow bed provides a home for your plants and filters the fish's water. Ensure the grow bed container is clean. Drill a hole near the bottom of the grow bed for the outflow tubing. Connect the flexible tubing to the outlet of your submersible water pump. Place the pump in the fish tank and run the tubing up to the grow bed, positioning the tubing so that water is distributed evenly across the bed. Fill the grow bed with your chosen grow media (clay pebbles, lava rock, etc.). Rinse the media thoroughly to remove any dust or debris.
Step 4: Planting and Stocking Now, it's time to introduce the life into your aquaponic garden! Gently transplant your seedlings or seeds into the grow media. Ensure the roots are covered. Acclimate your fish to the tank water temperature gradually by floating the bag they came in for about 15-20 minutes. Release the fish into the tank. Start with a small number of fish to avoid overloading the system.
Step 5: Setting Up the Water Cycle This step establishes the aquaponic cycle. Plug in the water pump. Adjust the flow rate so that the grow bed floods and drains regularly. Too much flow can stress the plants; too little flow can lead to nutrient deficiencies. If desired, use a timer to control the pump. A common setting is to run the pump for 15 minutes every hour. Monitor the water quality regularly. Check for ammonia, nitrite, and nitrate levels. Water testing kits are available at most pet stores.
Step 6: Maintenance and Care Consistent care will keep your mini aquaponic garden thriving. Feed your fish regularly with appropriate fish food. Don't overfeed, as this can pollute the water. Top off the water in the fish tank as needed due to evaporation. Use dechlorinated water. Clean the fish tank periodically (about once a month). Remove about 25% of the water and replace it with fresh, dechlorinated water. Harvest your plants as they mature. Consider adding nutrients supplements if plants appear nutrient deficient.
Conclusion: Enjoy Your Aquaponic Creation! Congratulations! You've successfully built your own mini aquaponic garden. With proper care and attention, you can enjoy fresh produce and the calming presence of fish in a self-sustaining ecosystem. Experiment with different plants and fish to discover what works best for you. Happy growing!
Mini Cooper D Dct (2018) Review
 www.carmagazine.co.uk
 White Mini Countryman
 ar.inspiredpencil.com
 2024 Mini Cooper Ev Fully Revealed As Urban Three-door Hatchback
insideevs.com  www.tinkercad.com ```html
  sketchfab.com
  sketchfab.com
  www.agrifarming.in
  www.plantsonwalls.com
  www.dreamstime.com
  agrierp.com
  www.greenlife.co.ke
 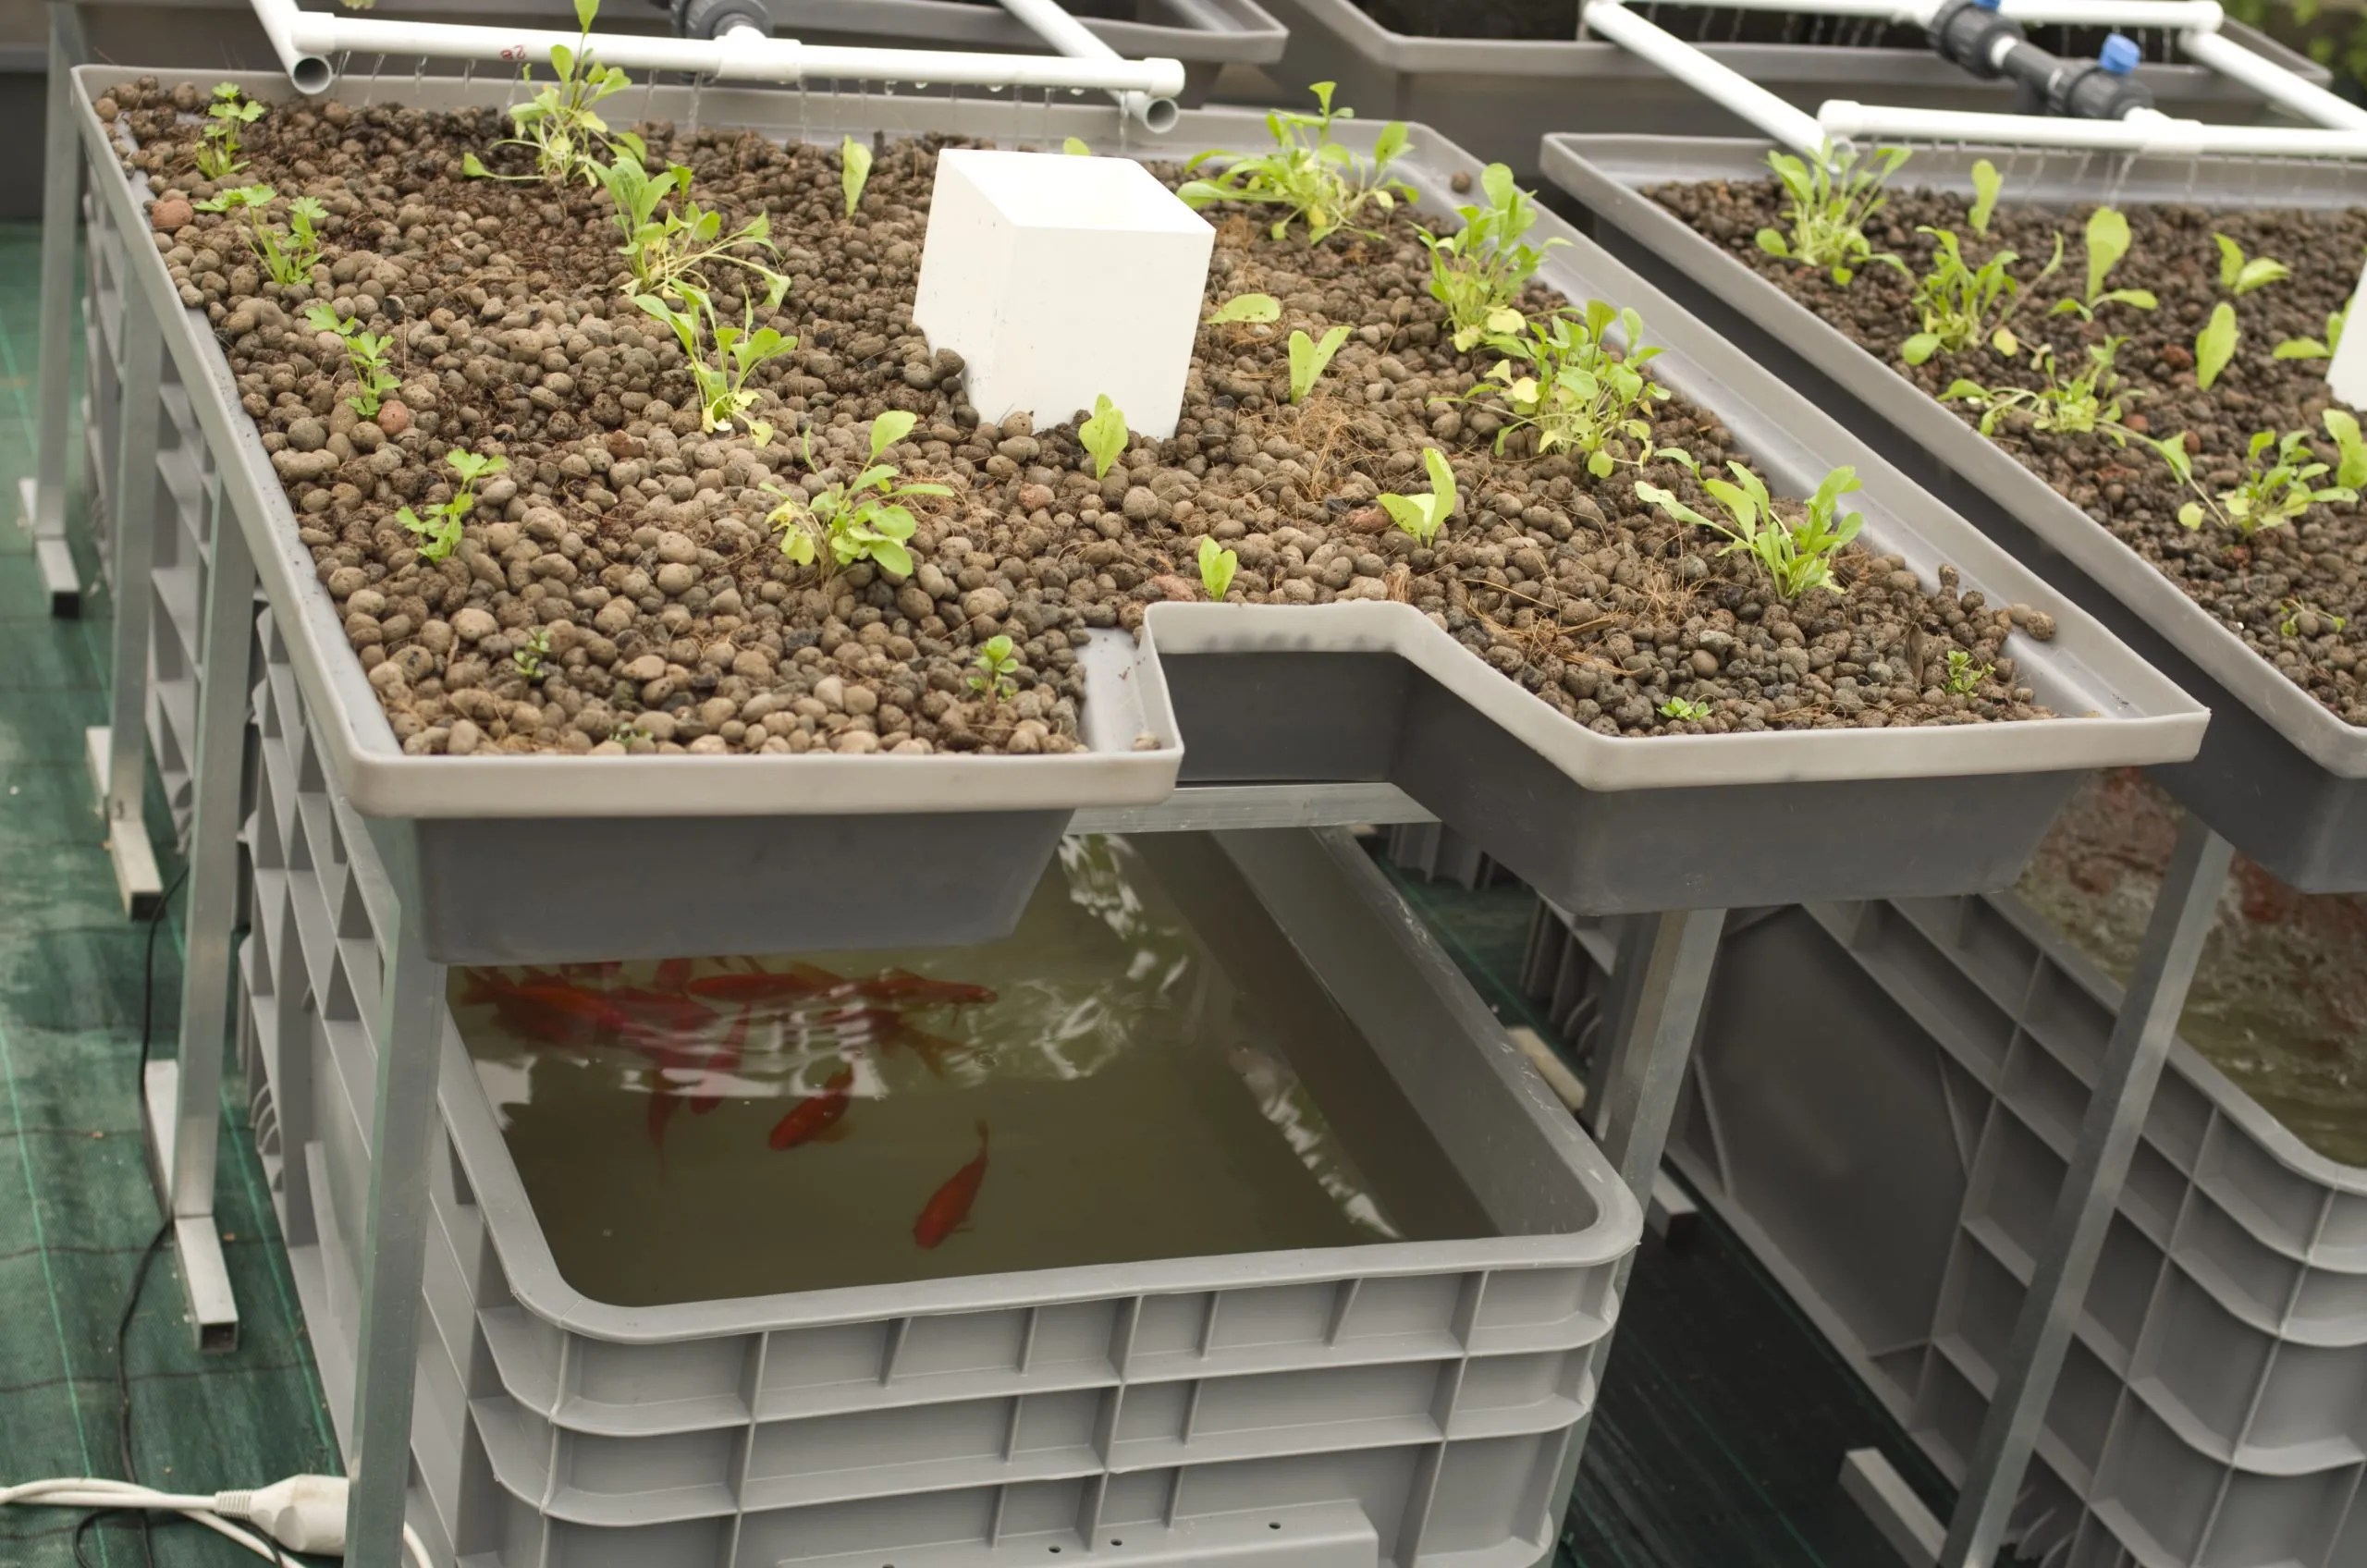 www.aquaponicsforbeginners.com
  fity.club
  agromoris.com
 /GettyImages-142873284-7afec7706c2a4997841bde2792c7ff6b.jpg) www.treehugger.com
www.treehugger.com  agromoris.com
  sneakernews.com
  www.harley-davidson.com
  www.harley-davidson.com
  www.pinterest.com
  circuitdbseriatim.z13.web.core.windows.net
  nueracannabis.com
  www.agrifarming.in ```html
  greentourism.world
  storage.googleapis.com
  fity.club
  www.pinterest.se
  www.urbangreenfarms.com.au ```html
  www.aquaponik.cz


